As you probably know, I use color. Sometimes a lot of color. The natural colors are a bit more expensive upfront than the cheapy gels I've been using .... but note the "upfront" part and keep on reading.
Thanks to a fellow blogger letting them know that I had told her about them when she also placed an order, I received 8 jars in the mail instead of 6 since they included 2 jars of "shimmer paint" as a thank you. John and I had to see what they looked like!
 |
| Clockwise from left: shimmer, red, orange, yellow, green, blue, black |
The first thing I did was layout the jars (except for the shimmer) and a silicone cup with 1/8 teaspoon of water in it for each one.
Then a teeny dab of color and stirred each up with a toothpick (because you know I can't survive without toothpicks)...
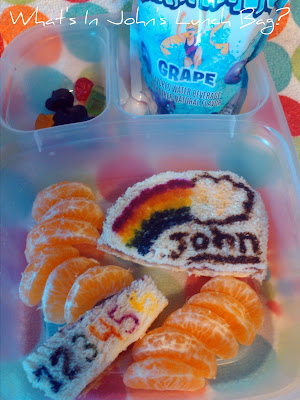
I opted for a rainbow on Italian bread so it could be fast, use all of the colors, and the bread was chosen because I figured the white would show off the colors better.
 |
| Used a watercolor brush for the rainbow stripes. Note to Self: Buy more brushes! |
 |
| Wrote John with a toothpick (with the point snipped off) using the black. |
 |
| Decided to give the shimmer a try and added a cloud to the rainbow! |
 |
| John wanted to help paint the "sparkly cloud" and hit the outline a couple of times which is why there's some smudge going on. |
Popped the slice of bread in a ziploc bag in the fridge and headed off for the museum at about 9:30am. We got home just after 1:30pm and I took the bread out to make lunch. The rainbow was still a little damp (I'll have to work on the water-to-powder ratio), and amazingly the cups still had some color waiting to to be used ... so I took my handy-dandy toothpicks and wrote numbers at the bottom before drying the bread by popping it in the toaster at the lowest setting (a nifty trick I used sometimes with the gel).
 |
| 1-Blue, 2-Black, 3-Green, 4-Orange, 5-Red, 6-Yellow |
John loves knowing that the colors are all made out of plants (as do I). He's always been quite the environmentally conscious little boy and even more so since watching the original cartoon version of Dr. Seuss' The Lorax. In fact, when he saw that there was still some color left in the cups after he was done eating he asked if he could have The Lorax for tomorrow's lunch (even though he's already planning on having him next week as well). I told you a little powder goes a long way and it's also why I made the comment about the upfront cost being more. These jars are going to last a lot longer than the gels!
So here's a preview for tomorrow:


oh wow! they look like they work great! awesome Karen :)
ReplyDeleteOh yay! I can't wait to start playing with mine!
ReplyDeleteYou ordered the oil-based powder, right? I read on another site that those DO NOT get mixed with water but alcohol or lemon extract ...
DeleteI'm wondering how well these work on cheese :/ I am very tempted to get some!
ReplyDeleteI'm doing a test with cheese now for today's lunch. It went ON beautifully both with toothpick and brush ... we'll see how it holds up by 11:30ish! (I've got it in the fridge now but he doesn't have one at school so I'll pop it out when it's time for the "bus" and let it sit til his lunch time)
DeleteZ says "Mama, do THAT lunch! Do that one!"
ReplyDeleteI bet you could paint them onto rubber stamps and stamp them onto food too...
Mmmmm, I'm feeling tempted!
ReplyDeleteLovely colors Karen and thanks for sharing the step by step tutorial:) Love the colorful lunch!
ReplyDeleteI want to know about cheese too! :)
ReplyDeleteLoving these. Going to order some myself as I get extra money, for when Demetri is a bit older. Do you know how long they last? Is there an exp date on them?
ReplyDeleteAccording to the site they'll last a year stored in a cool dark pantry, fridge or freezer :)
DeleteWow! The colours are beautiful. :)
ReplyDeleteYES! My son has a serious reaction to dyes. I have been looking for some, but leery since they are so pricey. YES!
ReplyDelete